
Deploying a ML Model in Django

While the trend in machine learning has grown so much nowadays, most of the data scientists are busy creating and training various machine learning models to solve different kinds of problems.
How about having a nice web interface where we can deploy our model to visualise the task we have trained our model to do?
In this blog, we will be using Django to deploy a machine learning model.
To install Django on your machine, simply type the following commands:
$ pip install django
$ pip install djangorestframework
Now, we will create a project in django. Let us say we want to deploy a text classification model.
$ django-admin startproject TextClassifier
You should see a directory structure like this:
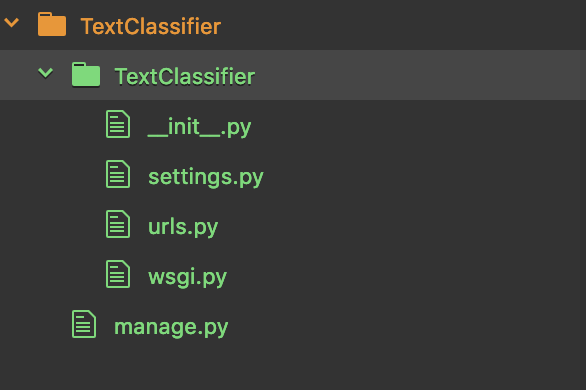
Now, we will have to create a django app. Let us name it as LstmClassifier.
$ cd TextClassifier
$ python manage.py startapp LstmClassifier
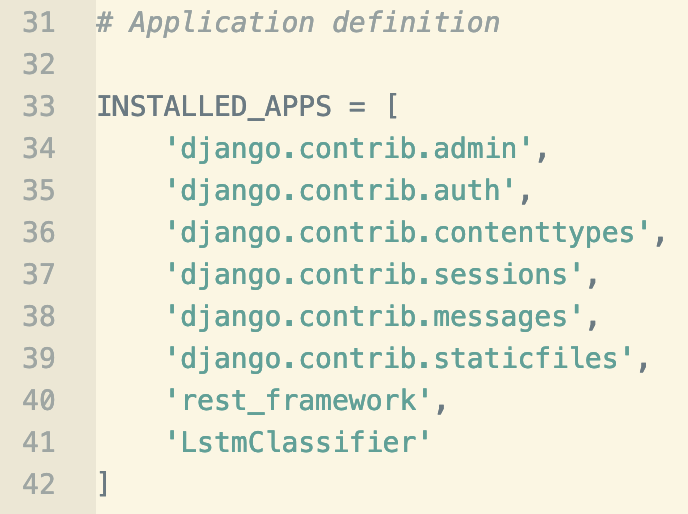
Now, we need to configure the settings.py file in TextClassifier by adding the rest_framework and the LstmClassifier app in the INSTALLED_APPS list.
The code should look like this:
Now, we will create a directory saved_model in the LstmClassifier directory and store our machine learning model there. We will also create a directory named as Data to store our vocab and word2id there which will be used in processing the text data.
Now, we will make some changes in apps.py where we will load the model and the essential data at once.
Let us do the coding now:

Now, we will have to add the required function to do the job which our endpoint call will be referring to. For that, we need to go to views.py. The code is like the one in the figure below:
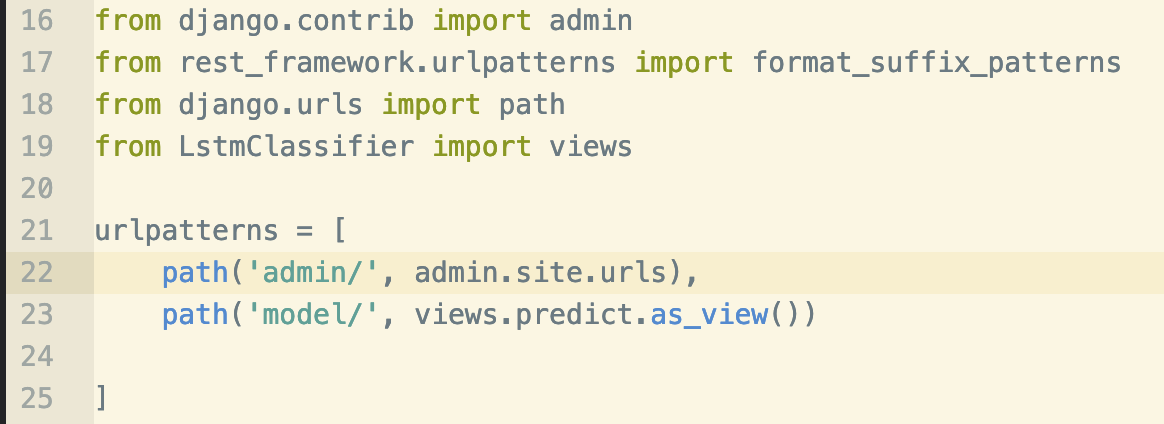
Now, we will define a URL for views in urls.py as follows:
By migrating, we enable the changes made to our model into the database. This can be done as follows:
$ python manage.py makemigrations
$ python manage.py migrate
The above functions can be taken similar to that of compiling and executing a code.
Now, its time to run the server:
$ python manage.py runserver
Open any browser and type localhost followed by the port number on which the server is running like: http://127.0.0.1:8000/model/?sentence=any_sentence and hit enter.
You should be getting a json output like this:
‘Class_Predicted’ : ‘two’
‘Probabilty’ : ‘0.963’
Finally, we have created a web app for our model. There is a tensorflow serving API also which does the same job and is much easy to use. We just need to convert our model into TensorFlow protobuff format and deploy our model there and it automatically gives us an end-point for our predictions.
Keep Learning, Keep Sharing 😊